
To clean a meat slicer, disassemble the parts and wash them with hot, soapy water. Rinse, sanitize, and dry all components thoroughly.
Maintaining a clean meat slicer is crucial for both hygiene and performance. Regular cleaning prevents bacterial buildup, ensuring safe and fresh food slices. Proper cleaning also extends the lifespan of the equipment, making it a worthwhile investment. Start by unplugging the slicer to ensure safety.
Disassemble the removable parts carefully and clean them with hot, soapy water. Use a soft brush for hard-to-reach areas. Rinse all parts thoroughly and sanitize them with a food-safe solution. Dry each component completely before reassembling the slicer. Regular maintenance will keep your meat slicer in top condition, providing you with efficient and safe operation.

Credit: quantumfoodsolutions.com
Why Cleaning A Meat Slicer Is Important
Introduction paragraph about How to Clean a Meat Slicer and Why cleaning a meat slicer is important…
Cleaning a meat slicer is crucial for several reasons. A clean meat slicer ensures food safety, prolongs the slicer’s life, and maintains the quality of your meat cuts.
Ensures Food Safety
A dirty meat slicer can harbor harmful bacteria. These bacteria can cause foodborne illnesses. Regular cleaning helps prevent contamination. A clean slicer ensures that your food is safe for consumption.
Prolongs The Slicer’s Life
Dirt and debris can damage the slicer’s components. Regular cleaning removes these elements. This helps in maintaining the slicer’s efficiency. A well-maintained slicer lasts longer, saving you money in the long run.
Maintains Quality Of Meat Cuts
Residue from previous cuts can affect the flavor and texture of your meat. Cleaning the slicer ensures that each cut is fresh and uncontaminated. This keeps your meat tasting its best.
Cleaning Frequency
| Cleaning Task | Frequency |
|---|---|
| Basic wipe-down | After each use |
| Deep cleaning | Daily |
| Blade sharpening | Weekly |
Steps For Cleaning A Meat Slicer
- Unplug the slicer to ensure safety.
- Remove the blade and other detachable parts.
- Clean each part with warm, soapy water.
- Rinse and dry each part thoroughly.
- Reassemble the slicer and sanitize it.

Credit: quantumfoodsolutions.com
Preparation Before Cleaning
Cleaning a meat slicer is crucial to maintain its performance and ensure food safety. Proper preparation before cleaning can make the task easier and more effective. This guide will walk you through the essential steps to prepare for cleaning your meat slicer efficiently.
Switch Off And Unplug The Meat Slicer
Before you start cleaning, always switch off and unplug the meat slicer. This ensures your safety and prevents accidental injuries. Follow these steps:
- Turn the power switch to the “off” position.
- Unplug the meat slicer from the electrical outlet.
- Double-check to make sure it is completely disconnected.
Unplugging the slicer prevents electrical hazards. Always prioritize safety. Ensure the slicer is on a stable surface to avoid tipping. Properly switched off and unplugged, the slicer is now safe to handle.
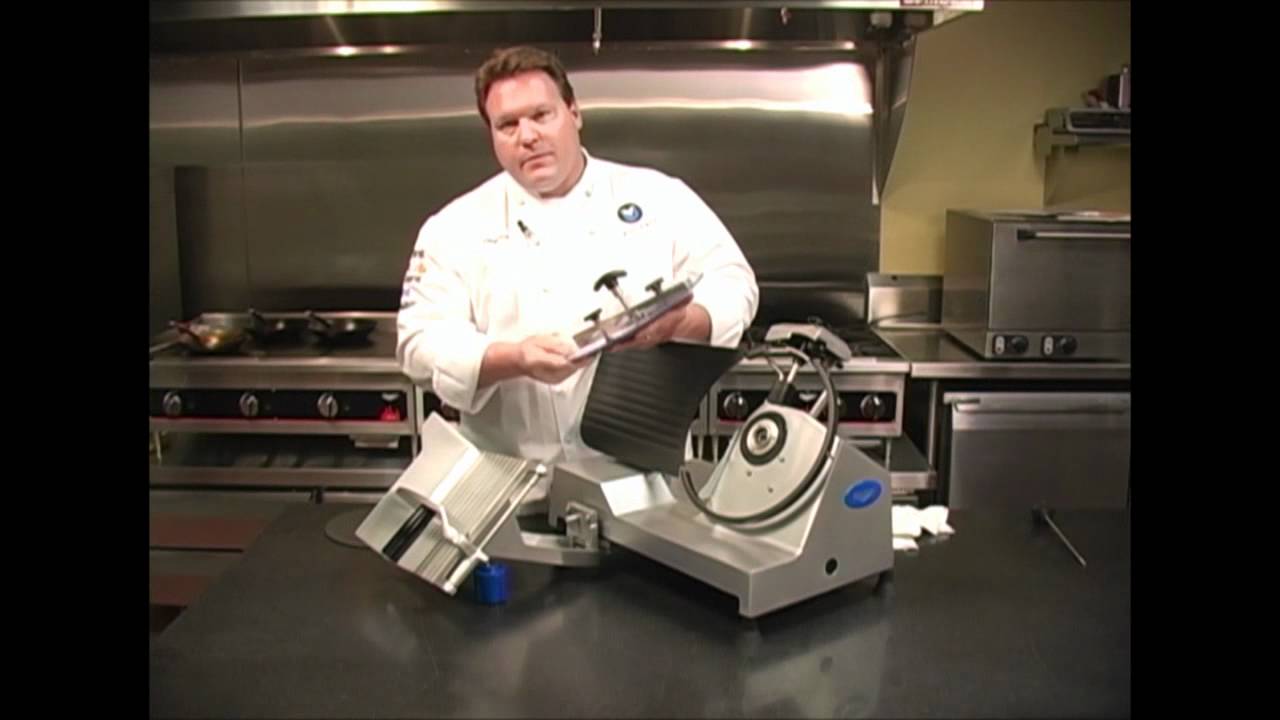
Disassemble The Meat Slicer
Cleaning The Meat Slicer
Keeping your meat slicer clean is essential for maintaining food safety and ensuring the longevity of your equipment. A well-cleaned meat slicer prevents cross-contamination and ensures that each slice of meat is fresh and safe to eat. In this section, we will guide you through the steps of cleaning your meat slicer effectively.
Wash Removable Parts In Hot Soapy Water
Begin by unplugging the meat slicer to ensure safety. Carefully disassemble the removable parts, such as the blade, food carriage, and food pusher. Place these parts in a sink filled with hot soapy water. Use a gentle brush or sponge to scrub each part, focusing on areas where meat residue might accumulate.
Pay close attention to:
- The blade: This is the most critical part to clean thoroughly.
- The food carriage: Scrub all surfaces where meat touches.
- The food pusher: Ensure all grooves and edges are cleaned.
After scrubbing, rinse each part under running water to remove soap residues. It’s important to ensure that no soap remains on the parts as it can affect the taste of the meat.
| Part | Cleaning Tool | Scrubbing Time |
|---|---|---|
| Blade | Soft brush | 2 minutes |
| Food Carriage | Sponge | 3 minutes |
| Food Pusher | Brush | 2 minutes |
Sanitize The Meat Slicer
After washing, it’s crucial to sanitize the meat slicer to eliminate any remaining bacteria. Prepare a sanitizing solution by mixing one tablespoon of bleach with one gallon of water. Soak a clean cloth in this solution and use it to wipe down all the removable parts and the main body of the slicer.
Make sure to cover:
- The blade: Pay special attention to the sharp edges.
- The main unit: Focus on all surfaces that come into contact with food.
- The screws and bolts: These areas can harbor bacteria if not properly sanitized.
Let the parts air dry for a few minutes to allow the sanitizer to work effectively. Rinse the parts with clean water afterward to remove any bleach residue, ensuring they are safe for food contact.
Use A Clean Cloth To Dry The Meat Slicer
Once sanitized, it’s essential to dry the meat slicer thoroughly to prevent rust and bacterial growth. Use a clean, dry cloth to wipe down all parts, ensuring they are completely dry before reassembling the slicer.
Steps to follow:
- Use a lint-free cloth to dry the blade.
- Ensure the food carriage and food pusher are moisture-free.
- Dry the main unit, focusing on all nooks and crannies.
Inspect each part to ensure no moisture remains. Reassemble the meat slicer carefully, making sure all parts are securely in place. Your meat slicer is now clean, sanitized, and ready for use.
Credit: www.youtube.com
Cleaning The Blade
Cleaning a meat slicer is essential to maintain hygiene and prolong the machine’s life. The blade is the most critical part of the slicer. Keeping it clean ensures your food remains safe and free from contamination. Follow these steps to effectively clean the blade of your meat slicer.
Remove The Blade
Before you start, ensure the slicer is unplugged to avoid accidents. Safety first! Follow these steps to remove the blade:
- Locate the blade lock: Most meat slicers have a lock or release mechanism. Refer to your user manual if needed.
- Wear cut-resistant gloves: Protect your hands with gloves to avoid cuts.
- Unscrew the blade: Use a screwdriver to remove the screws holding the blade. Keep the screws in a safe place.
- Gently lift the blade: Carefully lift the blade off the slicer. Be mindful of its sharp edges.
After removing the blade, place it on a clean surface. This will make the cleaning process easier and more effective.
Clean The Blade With A Sanitizer
Cleaning the blade with a sanitizer is crucial. It kills bacteria and ensures the blade is safe for use. Follow these steps:
- Prepare a sanitizer solution: Mix water with a food-safe sanitizer. Follow the instructions on the sanitizer label for the right ratio.
- Use a soft cloth or sponge: Dampen the cloth or sponge with the sanitizer solution.
- Wipe the blade thoroughly: Wipe both sides of the blade. Pay special attention to any grooves or crevices.
- Rinse with clean water: After sanitizing, rinse the blade with clean water to remove any sanitizer residue.
Ensure the blade is completely sanitized before moving to the next step. This prevents any contamination when you reassemble the slicer.
Dry The Blade Properly
Drying the blade properly is essential to prevent rust and maintain its sharpness. Follow these steps:
- Use a clean, dry towel: Pat the blade dry with a towel. Ensure there are no water droplets left.
- Air-dry the blade: Place the blade in a dry area. Let it air-dry for a few minutes.
- Inspect the blade: Check the blade for any moisture. Make sure it’s completely dry before reassembling.
- Store the blade safely: If you’re not reassembling it immediately, store the blade in a safe, dry place.
Proper drying prevents rust and keeps the blade in good condition. Always handle the blade with care to avoid accidents.
Reassembling The Meat Slicer
Cleaning a meat slicer is crucial for maintaining hygiene and ensuring the longevity of your equipment. After cleaning, reassembling the meat slicer correctly is the next vital step. This part of the process ensures that the slicer operates smoothly and safely. Let’s dive into the steps involved in reassembling your meat slicer.
Ensure All Parts Are Dry
Before reassembling your meat slicer, ensure that all parts are completely dry. Moisture can lead to rust and damage the slicer’s components. Here are some steps to follow:
- Use a clean, dry cloth to wipe down each part.
- For hard-to-reach areas, use a small brush or compressed air.
- Lay out the parts on a clean towel and allow them to air dry.
Pay special attention to the blade and any small crevices where water might hide. The table below highlights the drying time for different parts:
| Part | Drying Time |
|---|---|
| Blade | 10 minutes |
| Guard | 15 minutes |
| Slicer Base | 20 minutes |
Ensure no moisture remains to prevent any bacteria growth. Once all parts are dry, you can start reassembling the slicer.
Reassemble The Meat Slicer
Now that all parts are dry, begin reassembling the meat slicer. Follow these steps:
- Attach the blade first. Ensure it is secured tightly.
- Next, reinstall the blade guard. This is crucial for safety.
- Place the carriage back onto the slicer base.
- Reattach any small components, such as knobs or handles.
- Double-check all parts to ensure they are securely in place.
Refer to your meat slicer’s manual if you encounter any difficulties. The manual provides detailed instructions specific to your model. Here’s a quick checklist to ensure you’ve covered everything:
- Blade is secure
- Blade guard is in place
- Carriage is reattached
- All small components are secure
Test the slicer by turning it on briefly. Ensure it operates smoothly and safely. If you notice any issues, turn it off and recheck the assembly. Proper reassembly ensures your meat slicer functions correctly and safely.
Frequency Of Cleaning
Keeping your meat slicer clean ensures the safety and quality of your food. The frequency of cleaning your meat slicer is crucial to prevent contamination. Regular cleaning also helps maintain the slicer’s efficiency and lifespan. Understanding how often to clean your meat slicer can make a significant difference.
Daily Cleaning
Daily cleaning of your meat slicer is essential, especially in commercial kitchens. This practice removes food particles and prevents bacteria growth. Follow these steps for thorough daily cleaning:
- Unplug the slicer: Always disconnect it from the power source before cleaning.
- Disassemble: Remove the blade, food carriage, and other detachable parts.
- Wash parts: Use warm, soapy water to clean removable parts. Scrub gently with a brush.
- Sanitize: Apply a food-safe sanitizer to all parts, ensuring they are bacteria-free.
- Wipe down the base: Use a clean cloth dipped in soapy water to wipe the slicer’s base.
- Dry completely: Use a dry cloth or let the parts air dry before reassembling.
Consistency is key. Make sure to clean the slicer at the end of each day. This practice keeps your slicer in top condition and ensures food safety.
Weekly Cleaning
Weekly cleaning involves a more detailed approach. This process targets areas that might get missed during daily cleaning. Follow these steps for a deep weekly clean:
- Disassemble completely: Take apart all removable components, including the blade guard.
- Inspect: Check for any signs of wear, damage, or buildup. Replace parts if necessary.
- Deep clean: Soak parts in a solution of warm water and mild detergent. Use a brush to scrub crevices.
- Sanitize thoroughly: Use a stronger, food-safe sanitizer for a deeper clean.
- Lubricate: After drying, apply food-grade lubricant to the slicer’s moving parts.
- Reassemble: Put the slicer back together carefully, ensuring all parts are secure.
A weekly cleaning routine ensures any overlooked areas are addressed. This practice extends the life of your slicer and maintains its performance.
Tips For Maintaining Your Meat Slicer
Keeping your meat slicer clean is essential for food safety and longevity. Regular maintenance ensures smooth operation and prevents contamination. Here are some tips for maintaining your meat slicer to make sure it stays in top condition.
Sharpen The Blade Regularly
A sharp blade ensures clean, even slices and reduces strain on the machine. Sharpening the blade regularly is crucial. Follow these steps to keep your blade sharp:
- Unplug the meat slicer before sharpening.
- Clean the blade to remove any residue.
- Attach the sharpening stone according to the manufacturer’s instructions.
- Run the slicer for a few minutes to sharpen the blade.
- Remove the sharpening stone and clean the blade again.
Tip: Check the blade for nicks or damage before sharpening. Damaged blades should be replaced to ensure safety and efficiency.
Use Food-grade Lubricant
Lubricating your meat slicer reduces friction and wear on moving parts. Always use food-grade lubricant to avoid contamination. Here’s how to apply it:
- Unplug the meat slicer and disassemble the parts.
- Clean all components thoroughly.
- Apply a small amount of food-grade lubricant to the moving parts.
- Reassemble the slicer and wipe off any excess lubricant.
Important: Never use non-food-grade lubricants as they can contaminate your food and cause health issues. Regular lubrication keeps your meat slicer running smoothly and extends its lifespan.
Replace Worn-out Parts
Worn-out parts can affect the performance and safety of your meat slicer. Regular inspection and timely replacement of these parts are essential. Common parts that may need replacement include:
| Part | Signs of Wear |
|---|---|
| Blade | Nick, dull edges |
| Belt | Cracks, fraying |
| Motor | Unusual noise, overheating |
Note: Always use manufacturer-approved parts for replacements. This ensures compatibility and maintains the warranty of your meat slicer.
Store The Meat Slicer Properly
Proper storage prevents damage and keeps your slicer in good condition. Follow these tips for storing your meat slicer:
- Clean and dry all parts before storage.
- Cover the slicer with a dust cover or cloth to keep it clean.
- Store in a cool, dry place away from moisture and heat.
- Keep the slicer out of reach of children.
Pro Tip: Periodically check the slicer during storage to ensure it remains clean and free of rust or dust. Proper storage maintains the slicer’s efficiency and readiness for use.
Frequently Asked Questions
What Is The Best Way To Clean A Meat Slicer?
The best way to clean a meat slicer is to unplug it, disassemble removable parts, and wash it with warm, soapy water. Rinse thoroughly and sanitize all components. Dry completely before reassembling. Regular cleaning ensures hygiene and extends the slicer’s lifespan.
Should You Wash Your Meat Slicer After Using It?
Yes, always wash your meat slicer after each use. This prevents bacteria buildup and ensures food safety. Clean all parts thoroughly.
How Often Should A Meat Slicer Be Cleaned?
Clean a meat slicer after each use to prevent bacteria buildup. Deep clean it at least once a week. Regular maintenance ensures safety and extends the slicer’s lifespan.
Conclusion
Regularly cleaning your meat slicer ensures safety and efficiency. Follow these steps to maintain hygiene and longevity. A clean slicer prevents contamination and extends its lifespan. Always prioritize safety and proper maintenance. Your efforts will pay off with better-tasting and safer food.
Happy slicing!


Thanks..it’s really helps me❤️