To use the Kitchenaid Sausage Stuffer Attachment, slide the open casing end onto the stuffer tube, feed small amounts of ground meat into the hopper tube using the stomper, and gently press the meat into the worm gear. Kitchenaid offers a small Sausage Stuffer Tube to make breakfast sausage with casings.
If you’re interested in making your own sausages at home, the Kitchenaid Sausage Stuffer Attachment can be a useful tool to have in your kitchen. By following a few simple steps, you can create delicious sausages using your stand mixer.
We’ll explore how to set up and use the Kitchenaid Sausage Stuffer Attachment, as well as some tips and tricks for making sausage like a pro.

Credit: www.youtube.com
Introduction To Sausage Making
Making your own sausages at home can be a rewarding and delicious experience. Whether you are a seasoned chef or a beginner in the kitchen, creating your own sausages allows you to control the ingredients and flavors, resulting in a final product that is tailored to your taste preferences.
Benefits Of Homemade Sausage
When making sausage at home, you have the freedom to choose high-quality meats and spices, ensuring that your sausages are free from preservatives and additives. Additionally, you can customize the flavors to suit your palate, creating unique and personalized sausage blends. Homemade sausages also provide a sense of satisfaction and pride, knowing that you have crafted a delicious and wholesome product from scratch.
Tools Needed: Kitchenaid And Attachments
To embark on your sausage-making journey, you will need the KitchenAid stand mixer along with the sausage stuffer attachment. The KitchenAid stand mixer serves as the powerhouse for mixing and grinding the meat, while the sausage stuffer attachment seamlessly transforms the ground meat into perfectly stuffed sausages.

Credit: www.kitchenaid.com
Assembling The Sausage Stuffer
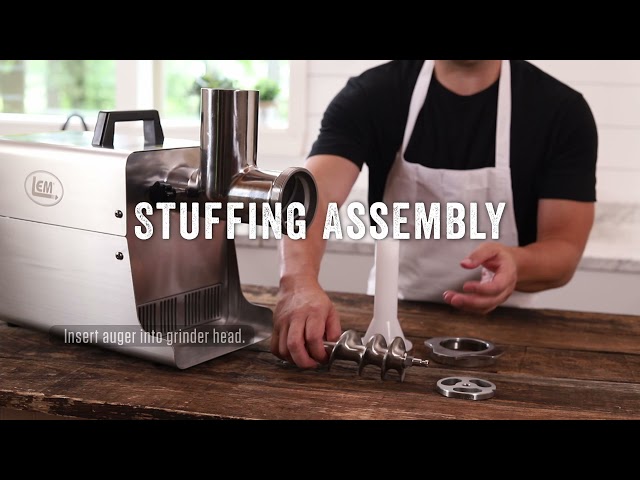
Before you start making your own delicious sausages at home with the KitchenAid Sausage Stuffer Attachment, you’ll need to assemble the attachment to your KitchenAid stand mixer. The assembling process involves connecting the food grinder and attaching the sausage stuffer tube. Let’s walk through the steps to ensure you get it set up correctly.
Connecting The Food Grinder
First, make sure the stand mixer is turned off and unplugged for safety. Then, attach the food grinder to the power hub of your stand mixer. Secure it in place by turning it clockwise until it locks into position. Ensure it is firmly attached before proceeding to the next step.
Attaching The Sausage Stuffer Tube
Once the food grinder is securely connected, it’s time to attach the sausage stuffer tube. Insert the tube into the food grinder and twist it clockwise to lock it in place. Ensure that it is properly aligned and secured to prevent any issues during the sausage stuffing process.
Preparation Of Meat And Spices
Before you start using the Kitchenaid Sausage Stuffer Attachment, it is important to properly prepare your meat and spices. This step is crucial in ensuring that your sausages have the perfect flavor and texture. In this section, we will guide you through the process of choosing the right meat cuts and blending spices and seasonings.
Choosing The Right Meat Cuts
When it comes to making sausages, selecting the right meat cuts is essential. You want to choose cuts of meat that have a good balance of fat and lean meat. This will help to create juicy and flavorful sausages. Here are some popular options for sausage making:
| Meat Type | Recommended Cuts |
|---|---|
| Pork | Shoulder, belly, or a combination of both |
| Beef | Chuck, brisket, or a combination of both |
| Chicken | Boneless, skinless chicken thighs |
When working with meat, it is important to ensure that it is properly chilled. This helps in achieving a better texture and prevents the meat from becoming too mushy during the grinding and stuffing process.
Blending Spices And Seasonings
Blending the right spices and seasonings is what gives sausages their distinct flavors. Here’s a simple guide on how to blend spices and seasonings:
- Start by selecting your preferred spices and seasonings. This can include salt, pepper, garlic powder, paprika, fennel seeds, and various herbs.
- Measure out the desired quantities of each spice and seasoning. It’s important to strike a balance between the flavors to ensure a well-rounded taste.
- In a small bowl, combine all the spices and seasonings. Mix them together thoroughly to ensure even distribution.
- Once the spices are blended, you can either sprinkle them directly onto the meat or mix them into the ground meat before stuffing.
Remember, the key to a successful blend is experimentation. Feel free to adjust the spice quantities to suit your personal taste preferences. Don’t be afraid to get creative and try new combinations!
By properly preparing your meat and blending spices and seasonings, you are setting the foundation for delicious homemade sausages. The next step is to use the Kitchenaid Sausage Stuffer Attachment to stuff your sausages and bring your culinary creations to life.
Grinding The Meat
To use the Kitchenaid Sausage Stuffer Attachment, start by sliding the open casing end onto the stuffer tube. Slowly feed pinches of ground, seasoned meat into the hopper tube, using the stomper to guide it into the worm gear. It’s important to take your time and be careful during the process.
Cutting And Chilling The Meat
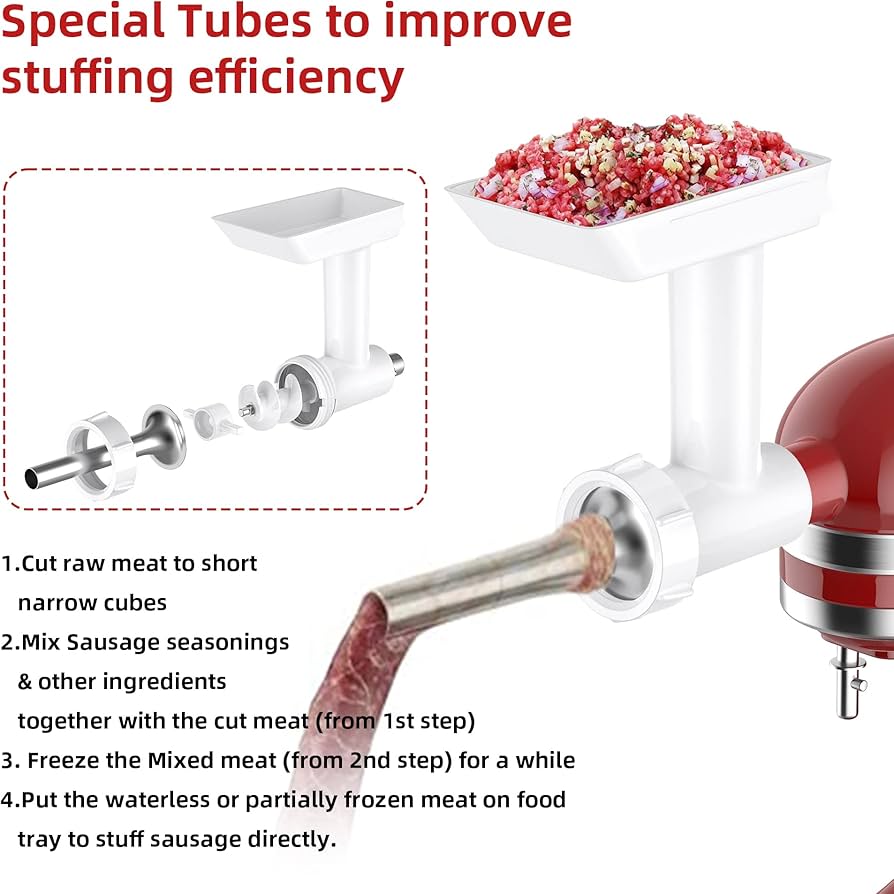
Before you begin grinding the meat for your sausages using the Kitchenaid Sausage Stuffer Attachment, it’s important to prepare the meat properly. Start by selecting the meat of your choice, whether it’s pork, beef, or a combination. It’s recommended to use cuts of meat with a good balance of fat and lean meat for the best flavor and texture.Using The Grinder Attachment
Once you have the meat ready, it’s time to attach the grinder to your Kitchenaid stand mixer. Follow these steps to ensure a smooth grinding process:- Ensure that the grinder attachment is securely attached to the stand mixer. It should fit snugly onto the power hub.
- Place a bowl or container beneath the grinder attachment to catch the ground meat.
- Feed the chilled meat into the hopper tube, using the stomper to gently push it down.
- Turn on the mixer to the desired speed, usually a medium setting is recommended for grinding.
- As the meat is pushed through the grinder, it will come out in the form of ground meat.
- Continue feeding the meat into the hopper tube until all the meat has been ground.
- Ensure that the meat is properly chilled. Cold meat will result in a better grind and prevent the meat from becoming too warm during the process.
- Cut the meat into small pieces that are suitable for feeding into the hopper tube. This will help the grinder process the meat more efficiently.
- Feed the meat into the hopper tube in small amounts at a time, using the stomper to gently push it down.
- Guide the meat into the hopper tube, making sure it enters the worm gear smoothly. Avoid overloading the grinder with too much meat at once.
- Continue feeding the meat into the hopper tube until all the meat has been ground.
- Collect the ground meat in a bowl or container placed beneath the grinder attachment.
Prepping The Sausage Casings
To prep the sausage casings for the KitchenAid sausage stuffer attachment, slide the open end of the casing onto the stuffer tube, ensuring the knot is at the tip. Slowly feed small amounts of seasoned meat into the hopper tube, guiding it with the stomper and pressing gently into the worm gear.
Types Of Casings
Before starting to prep the sausage casings, it is important to understand the different types of casings available. The most common types of casings are hog casings, sheep casings, and collagen casings. Hog casings are the most popular, as they are easy to handle and provide the perfect texture for sausages. Sheep casings are thinner than hog casings, making them perfect for breakfast sausages. Collagen casings are artificial casings that are made from collagen fibers and are perfect for those who prefer a vegetarian option.Sliding Casings Onto The Tube
Once you have selected the appropriate casings, it’s time to slide them onto the tube. Start by soaking the casings in cold water for at least 30 minutes, which will make them easier to handle. Next, slide the open end of the casing onto the stuffer tube, ensuring that the knot is right at the tip of the tube. Make sure that the casing is not twisted, as this can cause it to break during stuffing.Stuffing The Casings
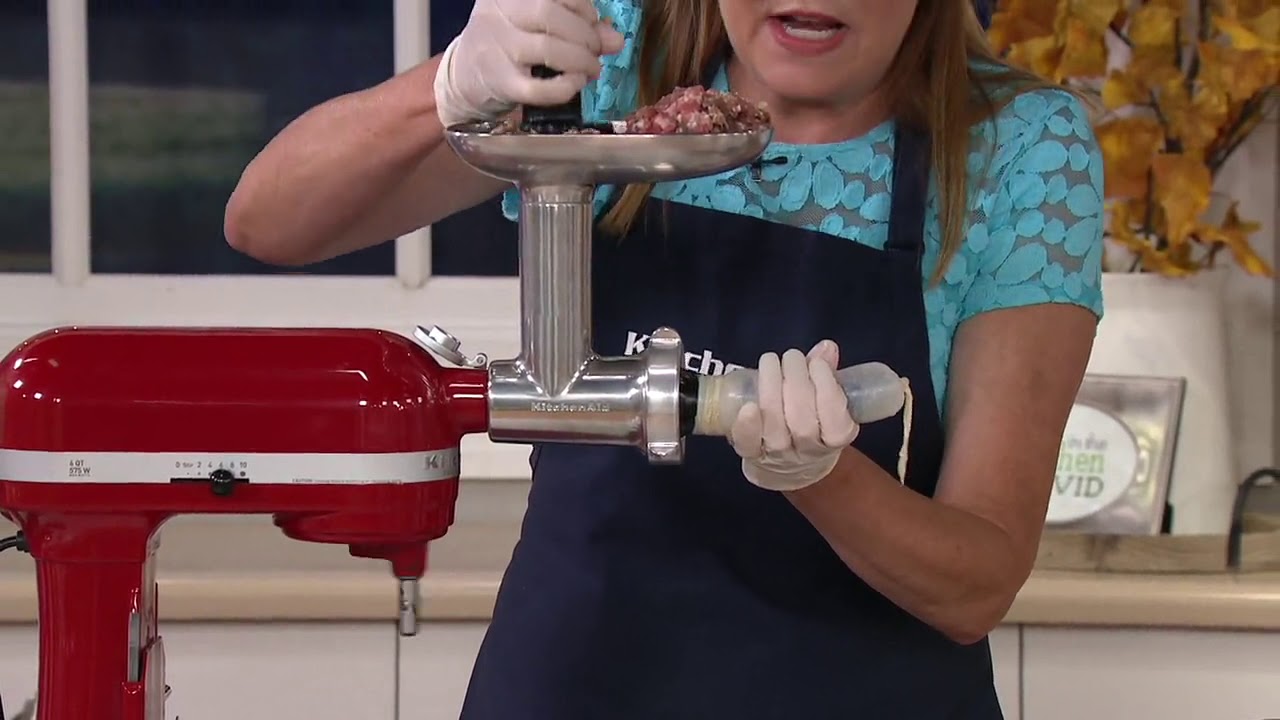
With the casings now prepped and on the stuffer tube, it’s time to start stuffing. Slowly and carefully feed pinches of the ground, seasoned meat into the hopper tube. Use the stomper to guide the meat into the hopper tube, gently pressing small amounts into the worm gear. It’s important to work slowly and carefully, as overstuffing the casing can cause it to burst.Cleaning The Attachment
Once you have finished stuffing the sausages, it’s time to clean the attachment. Start by removing any remaining meat from the hopper and stuffer tube. Next, disassemble the attachment and wash each part in warm, soapy water. Rinse each part thoroughly and dry before storing. In conclusion, prepping the sausage casings is an essential step in making sausages using the Kitchenaid sausage stuffer attachment. By understanding the different types of casings available and how to slide them onto the tube, you can ensure that your sausages are perfectly stuffed every time.The Stuffing Process
To use the Kitchenaid sausage stuffer attachment, start by sliding the open casing end onto the stuffer tube and feeding ground meat into the hopper tube using the stomper. Guide the meat into the hopper tube and gently press small amounts into the worm gear.
Lubricate the stuffer tube and adjust the speed to your preference before starting the stuffing process. Check out online tutorials for tips on making sausage like a pro with your Kitchenaid sausage stuffer attachment.
Filling The Hopper
Before starting the stuffing process, make sure the sausage stuffer attachment is securely attached to your Kitchenaid stand mixer. Then, prepare your sausage mixture and place it in the hopper. The hopper is the cylinder-shaped container located at the top of the attachment.Controlling The Stuffer Speed
Once the hopper is filled, you need to control the speed of the stuffer to ensure that the sausage is stuffed evenly and properly. The Kitchenaid sausage stuffer attachment comes with two speed options – high and low. The speed control switch is located on the side of the attachment. For a slower and more controlled stuffing process, choose the low speed option. To start the stuffing process, slide the open casing end onto the stuffer tube until the knot is right at the tip. Slowly and carefully feed “pinches” of the ground, seasoned meat into the hopper tube. Guide the meat into the hopper tube using the stomper and gently pressing small amounts into the worm gear.Ensuring Even Stuffing
To ensure even stuffing, it is important to avoid overstuffing the casings. Keep the sausage mixture moving through the tube at a steady pace, but do not push too much at once. Once the casing is filled with sausage, gently twist it to form links. You can also use a sausage pricker to remove any air pockets that may have formed during the stuffing process.Cleaning The Attachment
After the stuffing process is complete, it is important to clean the sausage stuffer attachment thoroughly. Disassemble the attachment by removing the stuffer tube, hopper, and worm gear. Wash each component in warm soapy water and dry thoroughly. Do not put any parts in the dishwasher as they may become damaged. In conclusion, using the Kitchenaid sausage stuffer attachment is an easy and efficient way to make your own homemade sausages. By following these simple steps, you can ensure that your sausages are evenly stuffed and delicious.Tying And Linking Sausages
Creating links and sealing the ends properly are important steps when using the Kitchenaid Sausage Stuffer Attachment. These techniques ensure that your sausages are well-formed and secure, ready to be cooked and enjoyed. In this section, we will guide you through the process of tying and linking sausages using the Kitchenaid Sausage Stuffer Attachment.
Creating Links
Creating links in your sausages not only adds visual appeal but also helps to portion them out. Follow these steps to create links:
- Once the sausage mixture has been stuffed into the casings, hold the casing firmly in one hand.
- Use your other hand to pinch and twist the sausage at the desired length, creating a link.
- Continue this process, alternating the direction of the twists for each link, until the entire length of the sausage has been linked.
By twisting and linking the sausages, you ensure that they stay separate and maintain their shape during cooking.
Sealing The Ends Properly
Properly sealing the ends of the sausages is essential to prevent any filling from escaping during the cooking process. Here’s how you can seal the ends:
- Once you have finished linking the sausages, leave a small amount of extra casing at each end.
- Hold the end of the casing and twist it multiple times to create a secure seal.
- If desired, you can also tie a knot at each end of the sausage for added security.
By sealing the ends tightly, you can ensure that the sausage remains intact and retains all of its delicious flavors.
With these simple steps, you can confidently tie and link sausages using the Kitchenaid Sausage Stuffer Attachment. Enjoy the process of creating homemade sausages and impress your friends and family with your culinary skills!
Credit: m.youtube.com
Cooking And Storing Sausages
Learn how to use the Kitchenaid sausage stuffer attachment to make delicious sausages at home. Simply slide the casing onto the stuffer tube, feed in the seasoned meat, and use the stomper to guide it through. Remember to lubricate the stuffer tube and work with sharp tools for best results.
Best Cooking Methods
When it comes to cooking sausages, there are several methods that you can choose from, depending on your preference and the type of sausage you have. Here are some of the best cooking methods to try:- Grilling: Grilling sausages is a popular method that brings out the smoky flavors and adds a nice char to the casing. Preheat your grill to medium heat and place the sausages directly on the grates. Cook for about 10-15 minutes, turning occasionally, until they are browned and cooked through.
- Baking: Baking sausages in the oven is a convenient method that allows for even cooking. Preheat your oven to 375°F (190°C) and place the sausages on a baking sheet lined with parchment paper. Bake for about 20-25 minutes, or until the internal temperature reaches 160°F (71°C).
- Sautéing: Sautéing sausages on the stovetop is a quick and easy method. Heat a skillet over medium heat and add a little oil. Place the sausages in the skillet and cook for about 8-10 minutes, turning occasionally, until they are browned and cooked through.
- Boiling: Boiling sausages is a common method used for certain types of sausages, such as bratwurst. Fill a pot with enough water to cover the sausages and bring it to a boil. Add the sausages and reduce the heat to a simmer. Cook for about 15-20 minutes, or until they are cooked through.
Storage Tips For Fresh Sausage
Proper storage of fresh sausages is essential to maintain their quality and safety. Here are some storage tips to keep in mind:- Refrigeration: Fresh sausages should be refrigerated promptly after purchase or preparation. Place them in an airtight container or wrap them tightly in plastic wrap. They can be stored in the refrigerator for up to 2-3 days.
- Freezing: If you have more sausages than you can consume within a few days, freezing is a great option. Wrap each sausage individually in plastic wrap or place them in freezer bags. Label them with the date and store them in the freezer for up to 3 months.
- Thawing: When you’re ready to use frozen sausages, thaw them in the refrigerator overnight. This gradual thawing method ensures even defrosting and helps preserve the quality of the sausages. Avoid thawing sausages at room temperature, as it can promote bacterial growth.
- Cooking from Frozen: If you forgot to thaw the sausages in advance, you can still cook them from frozen. Simply increase the cooking time by about 50% and ensure that the internal temperature reaches 160°F (71°C) to ensure they are fully cooked.
Troubleshooting Common Issues
To troubleshoot common issues with the KitchenAid Sausage Stuffer Attachment, ensure the casing is properly slid onto the stuffer tube and lubricate the tube before use. Also, feed the ground meat into the Food Grinder attachment before placing the casing on the stuffer tube.
Meat Consistency Problems
If the meat consistency is not right, it can lead to issues with the sausage stuffer attachment. Ensure that the meat is properly ground to the recommended consistency before attempting to use the attachment. Use a coarser grind for sausages with chunkier textures and a finer grind for smoother sausages. Additionally, make sure the meat is well chilled to prevent it from becoming too soft and difficult to work with.
Casings Not Filling Evenly
Uneven filling of casings can be a common issue when using a sausage stuffer attachment. To address this problem, ensure that the casings are properly loaded onto the stuffer tube, with no obstructions or twists that could impede the even filling of the sausages. Additionally, take care to regulate the speed and pressure at which the meat is fed into the stuffer to ensure a consistent and uniform filling of the casings.
Cleaning And Maintenance
Proper cleaning and maintenance of your Kitchenaid Sausage Stuffer Attachment are essential for ensuring its longevity and performance. By following the cleaning guidelines and practicing long-term care, you can keep your attachment in top condition for years to come.
Cleaning The Stuffer And Grinder
After each use, it’s important to thoroughly clean the stuffer and grinder components to prevent the buildup of residue and ensure food safety. Follow these simple steps to clean the attachment:
- Disassemble the stuffer and grinder attachment according to the manufacturer’s instructions.
- Wash each component in warm, soapy water, ensuring all food particles are removed.
- Rinse each part thoroughly and allow them to air dry completely before reassembling.
- Use a small brush to clean hard-to-reach areas and remove any stubborn residue.
- Store the attachment in a dry and clean environment to prevent rust or corrosion.
Long-term Care Of Attachments
For the long-term care of your sausage stuffer attachment, consider the following tips:
- Regularly inspect the attachment for any signs of wear or damage.
- Apply a thin layer of food-grade mineral oil to metal parts to prevent rust.
- Store the attachment in its original packaging or a protective case when not in use.
- Refer to the user manual for specific maintenance recommendations and intervals.
By incorporating these cleaning and maintenance practices into your routine, you can ensure that your Kitchenaid Sausage Stuffer Attachment remains in optimal condition, ready to deliver delicious sausages for years to come.
Frequently Asked Questions
How Do You Use A Kitchenaid Sausage Stuffer Kit?
To use a KitchenAid sausage stuffer kit, start by assembling the kit. Slide the open end of the casing onto the stuffer tube until the knot is at the tip. Slowly feed small amounts of ground meat into the hopper tube using the stomper.
Gently press the meat into the worm gear. Make sure to follow the instructions in the owner’s manual.
How Do You Put Sausage Casing On A Sausage Stuffer?
To put sausage casing on a sausage stuffer, slide the open casing end onto the stuffer tube. Slowly feed seasoned meat into the hopper tube using the stomper. Gently press small amounts into the worm gear to guide the meat.
How Do You Set Up A Sausage Stuffer?
To set up a sausage stuffer, attach it to the food grinder. Slide the casing onto the stuffer tube. Lubricate the tube, then feed ground meat into the grinder before sliding the casing on the stuffer tube.
Conclusion
The KitchenAid Sausage Stuffer Attachment is a versatile tool for making delicious sausages at home. With its easy assembly and user-friendly design, it allows you to create a variety of sausage flavors with ease. Whether you’re a seasoned chef or a novice cook, this attachment is a must-have for any kitchen.