To make an air-powered sausage stuffer, you will need to assemble the necessary parts, including a cap, base, head, piston, and o-rings. First, attach the cap to the base and head, then drill a hole in the cap for the piston.
Create grooves for anchor rings and add o-rings to ensure a tight seal. Finally, assemble the stuffer and test it with your desired sausage mixture. With a little DIY ingenuity and some basic tools, you can easily create a functional and efficient air-powered sausage stuffer for your kitchen or BBQ setup.
Introduction To Diy Sausage Stuffing
Making your own sausages at home can be a rewarding and enjoyable experience. With a DIY air-powered sausage stuffer, you can take your culinary skills to the next level and create delicious sausages exactly to your liking. In this guide, we will explore the benefits of homemade sausages and why choosing an air-powered sausage stuffer is a game-changer for sausage enthusiasts.
Benefits Of Homemade Sausage
1. Quality Control: When you make your own sausages, you have complete control over the ingredients, ensuring that you are using high-quality meats and spices.
2. Customization: Homemade sausages allow you to experiment with different flavors and seasonings, creating unique and personalized recipes to suit your taste preferences.
3. Healthier Option: By making your own sausages, you can avoid preservatives, additives, and excessive sodium commonly found in store-bought varieties.
Why Choose Air-power?
1. Efficiency: Air-powered sausage stuffers provide a faster and more efficient stuffing process compared to manual alternatives, saving you time and effort.
2. Consistency: The use of air pressure ensures a consistent and uniform sausage filling, resulting in evenly stuffed sausages with minimal air pockets.
3. Ease of Use: Air-powered systems are user-friendly, making the sausage stuffing process more manageable and accessible for home cooks of all skill levels.
Credit: www.farmshow.com
Tools And Materials Required
Making an air-powered sausage stuffer requires specific tools and materials to ensure smooth and efficient operation. Here’s a breakdown of the necessary components and guidelines for selecting the right air compressor:
List Of Necessary Components
Before diving into the assembly process, it’s essential to gather all the required components. Here’s a list of the necessary parts:
- Air compressor
- Pressure regulator
- Check valve
- Quick-connect fittings
- Steel pipe
- Threaded cap
- O-rings
- Plastic piston
- Food-grade grease
- Stainless steel sausage horn
Selecting The Right Air Compressor
The air compressor plays a crucial role in the functionality of the air-powered sausage stuffer. When selecting an air compressor, consider the following factors:
- Size: Ensure the compressor has sufficient capacity to provide consistent air pressure for the stuffer.
- Pressure Rating: Choose a compressor with a suitable pressure rating to match the requirements of the sausage stuffer.
- Portability: If mobility is essential, opt for a portable air compressor that can be easily transported to different work areas.
- Noise Level: Consider the noise level of the compressor, especially if working in a residential or noise-sensitive area.
By carefully selecting the right air compressor and gathering the necessary components, you’ll be well-equipped to construct an efficient air-powered sausage stuffer for your culinary endeavors.
Designing Your Stuffer
Learn how to create your own air-powered sausage stuffer with this easy DIY guide. Make a piston, attach the head, and assemble the stuffer to streamline your sausage-making process. Enjoy homemade sausages with your customized air-powered stuffer.
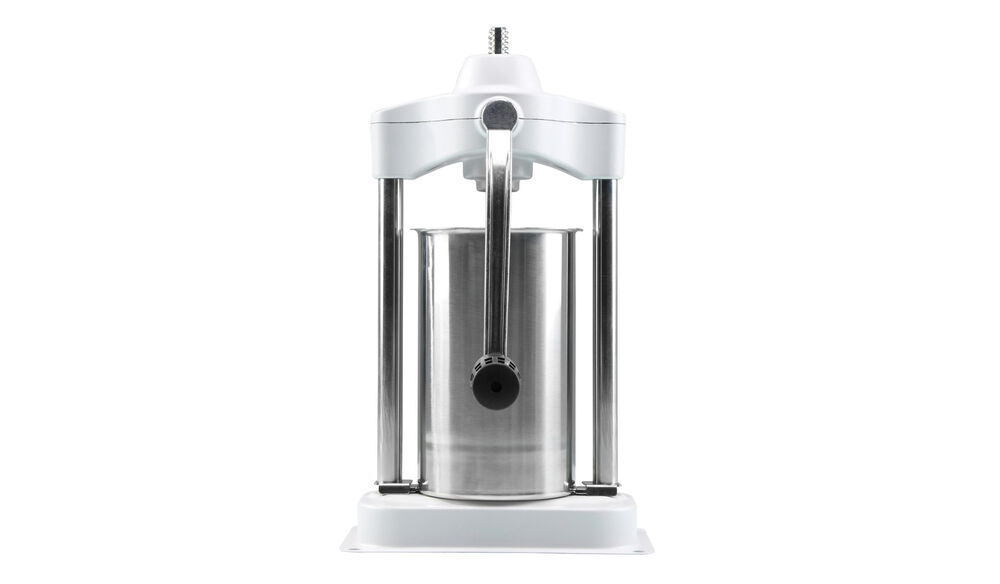
Determining Size And Capacity
When it comes to designing your air-powered sausage stuffer, one of the first considerations is determining the size and capacity you will need. This will depend on the amount of sausages you plan to make and the frequency of use. Here are some factors to consider:- Quantity: Think about how many sausages you want to make in a single batch. If you plan to make large quantities, you will need a stuffer with a larger capacity.
- Frequency: Consider how often you will be using the sausage stuffer. If you plan to use it frequently, you may want to invest in a larger stuffer to save time and effort.
- Space: Take into account the space available in your kitchen or workspace. Ensure that the sausage stuffer you choose fits comfortably without being too bulky.
- Portability: If you plan to take your sausage stuffer on the go or use it in different locations, consider a more compact and portable design.
Safety Considerations
When designing your air-powered sausage stuffer, it’s crucial to prioritize safety. Here are some important safety considerations to keep in mind:- Sturdy Construction: Ensure that the materials used for the stuffer’s construction are durable and can withstand the pressure exerted during the stuffing process.
- Secure Base: The stuffer should have a stable and non-slip base to prevent any accidents or tipping over while in use.
- Protective Measures: Incorporate safety features such as a protective guard or shield to prevent contact with moving parts and reduce the risk of injury.
- Easy Operation: Design the stuffer with user-friendly controls and mechanisms to minimize the chances of accidents or mishaps during operation.
- Cleanliness: Consider features that make the stuffer easy to clean and maintain, such as removable parts and smooth surfaces.

Credit: www.farmshow.com
Building The Base And Frame
When it comes to making an air-powered sausage stuffer, constructing a stable base and frame is essential. The base provides a solid foundation for the entire apparatus, while the frame holds all the necessary components together. In this section, we will guide you through the process of building a sturdy base and assembling the frame.
Constructing A Stable Base
To start, gather the following materials:
- 1 sheet of plywood (1-inch thick)
- 4 wooden planks (2×4 inches)
- Screws
- Drill
Follow these steps to construct a stable base:
- Measure and cut the plywood into a square shape.
- Place the wooden planks around the edges of the plywood, forming a border.
- Secure the planks to the plywood using screws and a drill.
- Ensure the base is level and stable by checking for any wobbling or unevenness.
Assembling The Frame
Now that you have a stable base, it’s time to assemble the frame. Here’s what you’ll need:
- Steel pipes (1-inch diameter)
- Elbow joints
- T-joints
- Clamps
- Wrench
Follow these steps to assemble the frame:
- Measure and cut the steel pipes according to your desired height and width for the frame.
- Attach elbow joints to the top of the vertical pipes to create the corners of the frame.
- Connect the horizontal pipes to the elbow joints using T-joints, forming the top and bottom sections of the frame.
- Secure the joints and pipes together using clamps and a wrench.
- Place the frame on top of the stable base, ensuring it is centered and secure.
By following these steps, you will have successfully built the base and frame for your air-powered sausage stuffer. The next step is to continue assembling the remaining components to complete the sausage stuffer. Stay tuned for the next section, where we will guide you through the process of building the piston and attaching the necessary parts.
Creating The Air-powered Mechanism
To create an air-powered mechanism for your sausage stuffer, you will need to assemble a few key parts. These include a cap, base, piston, and anchor rings. With some careful drilling and assembly, you can easily put together a powerful and efficient sausage stuffer that will make your homemade sausages a breeze to prepare.
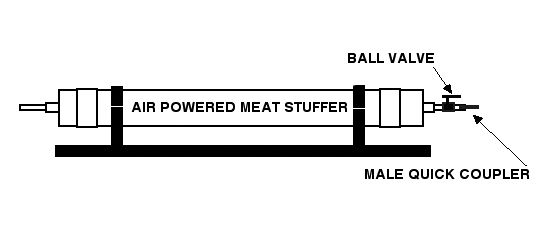
Creating the Air-Powered Mechanism: When it comes to making homemade sausage, having a reliable sausage stuffer can make the process much easier and more efficient. An air-powered sausage stuffer is a great option for those who want to take their sausage-making to the next level. In this post, we’ll walk you through the process of creating the air-powered mechanism for your sausage stuffer, with a focus on attaching the air cylinder and configuring the airflow control. Attaching the Air Cylinder: The first step in creating your air-powered sausage stuffer is to attach the air cylinder. This will provide the power for the stuffer. Start by securing the cylinder to the base of your stuffer. Then, attach the cap to the base of the cylinder using screws. Make sure the cap is sealed tightly to prevent any air leakage. Configuring the Airflow Control: Once you have the air cylinder attached, it’s time to configure the airflow control. This will allow you to adjust the speed and pressure of the air as it enters the cylinder. Begin by drilling a hole in the cap of the cylinder. This is where you will attach the air hose. Next, create a piston that fits snugly inside the cylinder. This will help to regulate the airflow and prevent any air from escaping. After creating the piston, you’ll need to make grooves for anchor rings. These rings will help to keep the piston in place as the air enters the cylinder. Once you have the anchor rings in place, it’s time to attach the air hose. Be sure to check the diameter of the rim to ensure a tight fit. Finally, assemble the stuffer and test it to ensure that the airflow control is working properly. In conclusion, creating an air-powered sausage stuffer is a great way to take your sausage-making to the next level. By following these steps for attaching the air cylinder and configuring the airflow control, you can create a reliable and efficient sausage stuffer that will make the process much easier and more enjoyable.The Sausage Tube And Nozzle
Learn how to make an air-powered sausage stuffer using the Sausage Tube and Nozzle. With the right parts and assembly, you can create a homemade stuffer that is easy to use and can produce perfectly stuffed sausages every time. Follow step-by-step instructions from various online resources to make your own air-powered sausage stuffer.
The sausage tube and nozzle are crucial components in an air-powered sausage stuffer. Choosing the right materials for these parts is essential to ensure that they are durable and can withstand the pressure required to push the sausage meat through the tube and nozzle. When choosing materials, it is important to select food-grade materials that are safe for use with food. Stainless steel is a popular choice due to its durability and resistance to rust and corrosion. Other materials to consider include brass and plastic. Crafting and attaching the nozzle requires precision and attention to detail to ensure that it fits securely onto the sausage tube. The nozzle should have a tight fit to prevent air from escaping and to keep the sausage meat from leaking out. To craft the nozzle, use a lathe or drill press to shape it into the desired size and shape. Once the nozzle is ready, attach it to the sausage tube using a clamp or other secure fastening method. Make sure to test the connection to ensure that it is airtight and secure. To further improve the performance of the air-powered sausage stuffer, consider adding grooves for anchor rings to the sausage tube. These grooves help to keep the sausage casing in place and prevent it from slipping off the tube. Additionally, o-rings can be added to the sausage tube to provide a tight seal and prevent air from escaping. In summary, choosing the right materials and crafting and attaching the nozzle are crucial steps in making an air-powered sausage stuffer. By following these steps and paying attention to detail, you can create a high-quality sausage stuffer that produces perfectly stuffed sausages every time.Assembly And Testing
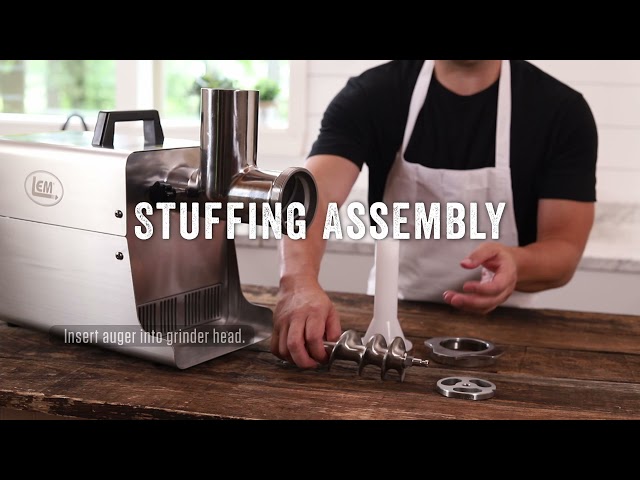
Now that you have gathered all the necessary components and tools for your air-powered sausage stuffer, it’s time to put the pieces together and conduct initial tests to ensure everything is working properly. Follow the step-by-step instructions below to assemble your sausage stuffer:
Putting The Pieces Together
- Attach the cap to the base by aligning the holes and securing them with screws.
- Next, attach the head to the base by inserting the head into the opening and tightening the screws.
- Drill a hole in the cap to accommodate the air hose fitting. Make sure the hole is the appropriate size for a tight fit.
- Now, it’s time to make the piston. Follow the provided instructions or refer to the tutorial video for detailed guidance.
- Create grooves for anchor rings on the piston to ensure a secure fit.
- Obtain o-rings from a reliable source and check their diameter to ensure they fit snugly on the piston.
- With all the components prepared, you are ready to proceed with the assembly.
Conducting Initial Tests
Before using your air-powered sausage stuffer for actual sausage-making, it’s crucial to conduct some initial tests to ensure its functionality. Follow these steps to conduct the tests:
- Connect the power supply to the air compressor and ensure it is properly functioning.
- Attach the air hose to the fitting in the cap of the sausage stuffer.
- Fill the sausage stuffer cylinder with a test material, such as a sausage mixture or a similarly textured substance.
- Turn on the air compressor and gradually increase the air pressure to observe the piston movement.
- Monitor the flow and consistency of the test material as it is pushed through the sausage stuffer.
- Adjust the air pressure as needed to achieve the desired consistency and flow rate.
- Take note of any issues or adjustments that need to be made before using the sausage stuffer for actual sausage preparation.
By following these assembly and testing steps, you will ensure that your air-powered sausage stuffer is functioning properly and ready to be used for making delicious homemade sausages. Enjoy the convenience and efficiency of this innovative sausage stuffer!
Operation And Usage Tips
Discover the top operation and usage tips for creating an air-powered sausage stuffer. Learn how to assemble the components, adjust the air pressure, and efficiently stuff sausage casings with ease. Master the art of homemade sausage making with this innovative and practical method.
When it comes to operating and using your air-powered sausage stuffer, there are a few important tips to keep in mind. Proper preparation of the sausage mixture, as well as effective filling and stuffing techniques, will ensure that you achieve the best results.
Preparing The Sausage Mixture
Before you begin using your air-powered sausage stuffer, it’s essential to prepare the sausage mixture properly. Follow these steps to ensure the best texture and flavor:
- Start by selecting the right cuts of meat, such as pork shoulder or beef chuck, and trim away any excess fat.
- Cut the meat into small cubes or strips, making it easier to grind.
- Season the meat with your desired spices and seasonings, such as salt, pepper, garlic, or herbs.
- If you prefer a finer texture, run the seasoned meat through a meat grinder using the appropriate plate size.
- Once the meat is ground, mix it thoroughly to distribute the seasonings evenly.
- Cover the mixture and refrigerate for at least an hour to allow the flavors to meld together.
Filling And Stuffing Techniques
When it comes to filling and stuffing your sausage casings, there are a few techniques that will help you achieve consistent results:
- Soak the sausage casings in warm water to soften them before using. This will make them more pliable and easier to work with.
- Attach the sausage casing to the nozzle part of the funnel, leaving a two-inch tail and knotting it securely.
- Take small amounts of the sausage mixture and gently push them into the mouth of the funnel, allowing the casing to fill gradually.
- Avoid overfilling the casing, as this can cause it to burst. Leave a little space at the end to allow for twisting or tying off.
- As you fill the casing, use your fingers to evenly distribute the mixture and remove any air pockets.
- Once the casing is filled, twist or tie off the end to secure the sausage.
By following these operation and usage tips, you’ll be able to make the most of your air-powered sausage stuffer and create delicious homemade sausages with ease.
Cleaning And Maintenance
Proper cleaning and maintenance are essential for ensuring the efficient and hygienic operation of your air-powered sausage stuffer. Following the correct procedures and routine maintenance tips will not only prolong the lifespan of your equipment but also guarantee the safety and quality of the sausage production process.
Proper Cleaning Procedures
When it comes to cleaning your air-powered sausage stuffer, it is crucial to follow the proper procedures to prevent cross-contamination and ensure the removal of any residual meat or debris. Here are the steps to clean your sausage stuffer effectively:
- Disassemble the stuffer: Remove all parts and components of the sausage stuffer as per the manufacturer’s instructions.
- Wash with warm soapy water: Thoroughly clean all parts with warm soapy water to remove any meat residue, oils, and bacteria.
- Rinse and dry: After washing, rinse all components with clean water and ensure they are completely dry before reassembly.
- Sanitize: Use a food-safe sanitizer to disinfect all parts to eliminate any remaining bacteria or pathogens.
- Reassemble: Once cleaned and dried, reassemble the sausage stuffer according to the manufacturer’s guidelines.
Routine Maintenance Tips
To keep your air-powered sausage stuffer in optimal working condition, regular maintenance is essential. Here are some routine maintenance tips:
- Lubrication: Apply food-grade lubricant to the moving parts to reduce friction and ensure smooth operation.
- Inspect seals and O-rings: Regularly check the seals and O-rings for any signs of wear or damage, and replace them if necessary to maintain a tight seal.
- Clean after each use: After each use, clean the stuffer thoroughly to prevent the accumulation of meat and bacteria.
- Check for wear and tear: Inspect all components for signs of wear, corrosion, or damage, and address any issues promptly.
- Store properly: When not in use, store the sausage stuffer in a dry and clean environment to prevent rust and contamination.
Troubleshooting Common Issues
When using an air-powered sausage stuffer, you may encounter some common issues that can hinder the sausage-making process. Here are some troubleshooting tips to help you resolve these issues and ensure a smooth sausage stuffing experience.
Resolving Air Leaks
If you notice air leaks in your air-powered sausage stuffer, it can lead to inefficiencies and affect the quality of your sausages. To address this issue:
- Check the connections: Ensure that all the connections and fittings are securely tightened to prevent any air leaks.
- Inspect the seals: Examine the seals and O-rings for any signs of wear or damage. Replace any worn-out seals to prevent air leaks.
- Apply lubricant: Applying a food-grade lubricant to the seals and O-rings can help create a better seal and reduce the risk of air leaks.
Handling Jamming Problems
Jamming can be frustrating and disrupt the sausage stuffing process. Here’s how you can tackle jamming issues:
- Adjust the pressure: If the sausage meat is getting jammed, try adjusting the air pressure to a level that allows for smooth and consistent stuffing without causing blockages.
- Clean the components: Regularly clean and lubricate the piston and cylinder to prevent meat from sticking and causing jams during the stuffing process.
- Monitor the consistency: Ensure that the sausage meat is of the right consistency and texture to prevent clogging and jamming in the stuffer.
Customizations And Upgrades
When it comes to making your own air-powered sausage stuffer, the possibilities for customizations and upgrades are endless. Enhancing performance and adding features can take your sausage-making experience to the next level. Whether you’re a seasoned sausage maker or just starting out, here are some ideas to help you customize and upgrade your air-powered sausage stuffer.
Enhancing Performance
If you’re looking to enhance the performance of your air-powered sausage stuffer, there are a few key areas you can focus on. Firstly, consider upgrading the air compressor to ensure a consistent and powerful air supply. A higher-quality compressor can provide a more reliable and efficient operation, resulting in smoother and faster sausage stuffing.
Another way to enhance performance is by improving the sealing mechanism. By using high-quality O-rings and lubricating them properly, you can minimize air leaks and maximize the pressure inside the stuffer. This will allow for better control and precision during the stuffing process, resulting in evenly filled sausages with minimal air pockets.
Adding Features
Adding features to your air-powered sausage stuffer can make the sausage-making process even more convenient and efficient. One popular upgrade is the addition of a foot pedal or a remote control system. This allows you to control the air pressure and the stuffing process with your feet or from a distance, freeing up your hands for other tasks.
Another useful feature is a pressure gauge. Installing a pressure gauge on your sausage stuffer can help you monitor and adjust the air pressure more accurately, ensuring consistent results every time. It allows you to fine-tune the pressure based on the type of sausage casing or filling, resulting in perfectly stuffed sausages with the desired texture and appearance.
Additionally, you can consider adding a digital timer or a programmable controller to your sausage stuffer. This allows you to set specific stuffing times and intervals, making it easier to achieve consistent results and reducing the risk of overstuffing or understuffing the sausages.
Remember, when customizing and upgrading your air-powered sausage stuffer, safety should always be a priority. Make sure to follow the manufacturer’s guidelines and consult with experts if needed. With the right customizations and upgrades, you can take your sausage-making skills to new heights and impress your friends and family with delicious homemade sausages.
Credit: www.verfoodsolutions.com
Frequently Asked Questions
How Do You Make Homemade Sausage Stuffer?
To make a homemade sausage stuffer, you can use a funnel and a meat grinder. Place the open end of the sausage casing over the funnel nozzle and push it up onto the nozzle, leaving a two-inch tail. Then, push small amounts of sausage meat into the funnel and into the casing using your thumb.
Be careful not to overfill it. Alternatively, you can use an air-powered or water-powered sausage stuffer for a more efficient process.
How To Stuff Sausage Casings Without A Machine?
To stuff sausage casings without a machine, use a funnel. Place casing on the nozzle, leaving a tail. Push sausage meat into the funnel and casing. Avoid overfilling to prevent breakage. This method is ideal for making homemade sausages without specialized equipment.
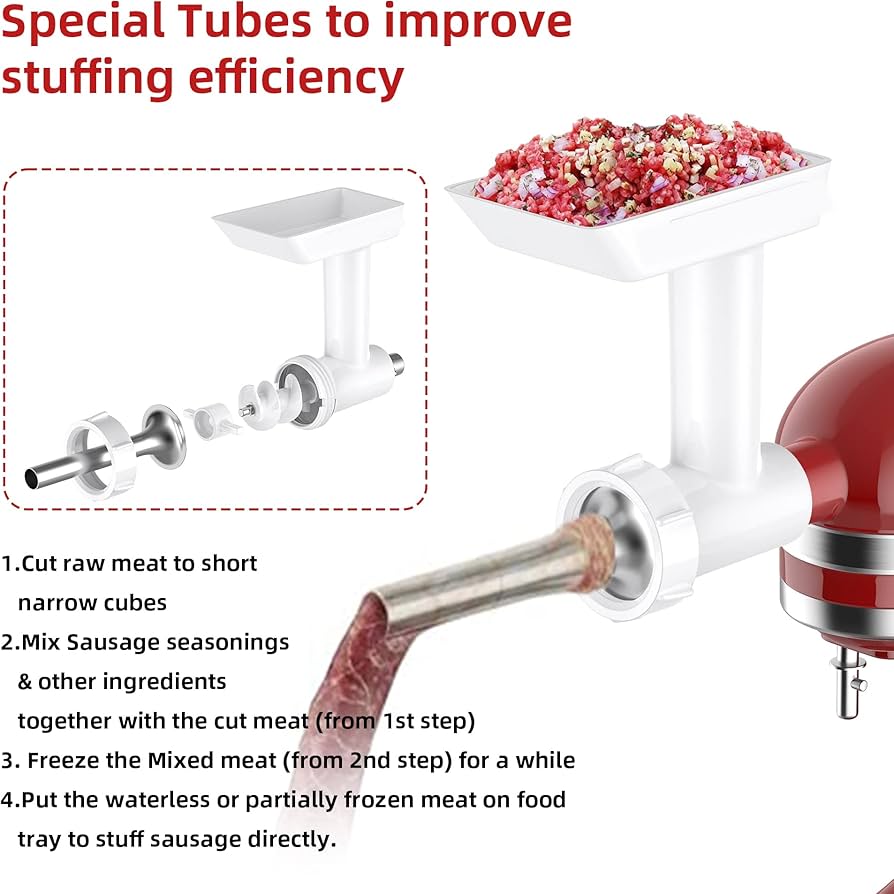
Can You Use A Meat Grinder To Stuff Sausage?
Yes, you can use a meat grinder to stuff sausage. Simply attach a sausage stuffing tube to the grinder.
Conclusion
Creating an air-powered sausage stuffer can be a rewarding and cost-effective project. By following the steps outlined in this guide, you can enjoy the convenience and efficiency of a homemade sausage stuffer. Whether you’re a hobbyist or a professional, this DIY solution can streamline your sausage-making process.