Are you tired of the same old look of your Kitchen Aid appliance? With the right techniques, you can give it a fresh, personalized touch. Many homeowners wonder, ‘Can I paint my Kitchen Aid?’ — and the answer is a resounding yes! As a seasoned expert in DIY projects, I will guide you through the necessary steps, from preparing the surface to selecting the best paint materials. In this article, you’ll learn not only how to safely paint your Kitchen Aid but also tips for achieving a professional-looking finish. Whether you’re looking to match your kitchen decor or simply want to refresh your appliance, this comprehensive guide will equip you with all the knowledge you need.
Understanding the Basics of Painting Kitchen Appliances
Painting kitchen appliances, including stand mixers, can be an appealing way to refresh their look. However, it’s essential to understand the materials and finishes involved. Most kitchen appliances are coated with a durable finish designed to withstand wear and tear. Painting these surfaces requires careful consideration to ensure both aesthetics and functionality are maintained. Preparation is key to achieving a professional-looking result that lasts. Always ensure you are using the right type of paint and following safe practices.
Materials Used in Kitchen Appliances
Kitchen appliances are typically made from metal, plastic, or a combination of both. Each material reacts differently to paint. Metal surfaces may require a primer for better adhesion, while plastic may need a specific type of paint to prevent chipping. Knowing your appliance’s material is crucial for a successful paint job.
Choosing the Right Type of Paint
Not all paints are suitable for kitchen appliances. Look for paints designed for metal or plastic surfaces, which provide durability and heat resistance. Spray paint can offer a smooth finish, while brush-on paint allows for more detail. Always check for compatibility with your appliance’s material to avoid peeling or bubbling.
Preparation Steps Before Painting
Proper preparation is vital for a successful paint job. Start by cleaning the surface thoroughly to remove grease and grime. Sanding the surface lightly can help the paint adhere better. Additionally, consider using painter’s tape to protect areas that shouldn’t be painted, ensuring clean lines and a professional finish.
Key Points:
- Understand the materials before starting the project
- Select the appropriate paint type for durability
- Preparation is crucial for optimal results
The Process of Painting Your Kitchen Aid
Once you have a clear understanding of your appliance and the materials involved, it’s time to dive into the painting process. This involves several steps, including disassembly, priming, painting, and reassembly. Following a systematic approach ensures that your paint job is not only aesthetically pleasing but also long-lasting. Always work in a well-ventilated area and allow ample drying time between each step to achieve the best results.
Disassembling the Appliance
Before painting, carefully disassemble the appliance. This may involve removing attachments and any detachable parts. Take photos during disassembly to remember how to put everything back together. This step helps to ensure a clean paint job without overspray on parts that won’t be painted.
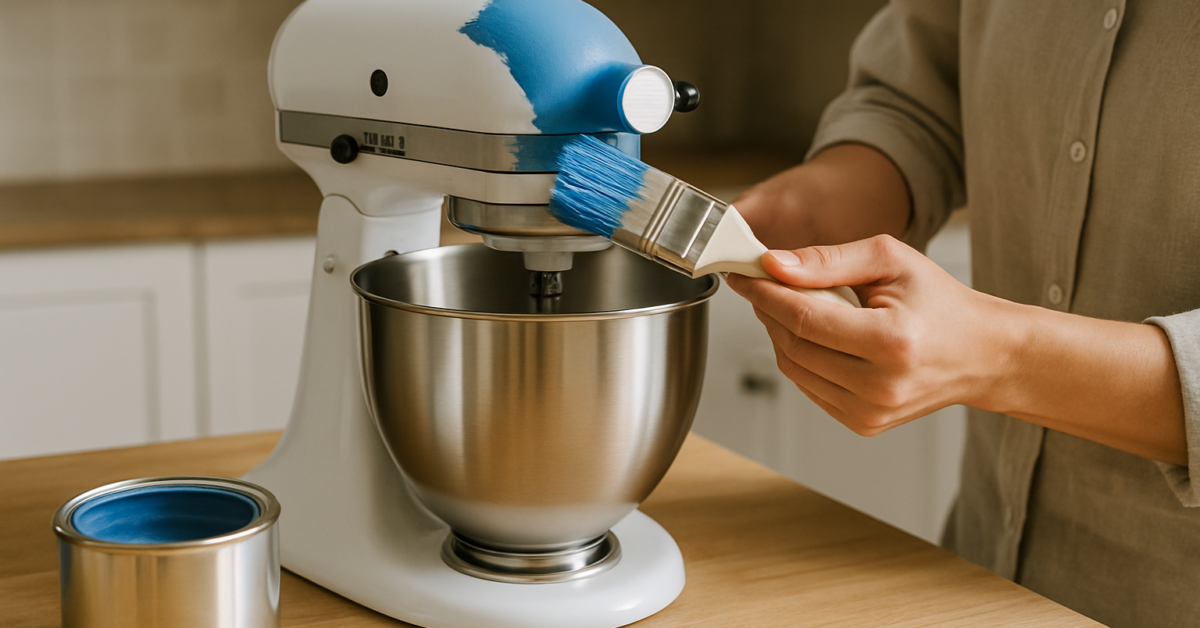
Applying Primer and Paint
Start with a primer designed for the appliance’s material, applying it evenly to avoid drips. Once the primer is dry, apply the paint in thin layers, allowing each layer to dry completely before adding the next. This technique helps to avoid runs and maintains a smooth finish.
Reassembling and Final Touches
After the paint has dried thoroughly, carefully reassemble your kitchen appliance. Inspect for any touch-ups needed and make sure all parts fit correctly. Allow the paint to cure fully before using the appliance to ensure the best durability and finish.
Key Points:
- Disassemble the appliance for a clean paint job
- Apply paint in thin layers for a smooth finish
- Allow adequate drying time before reassembling
Understanding the Feasibility of Painting Your Kitchen Aid
Before embarking on the journey of painting your Kitchen Aid appliance, it is essential to understand the feasibility of this task. Not all surfaces are suitable for painting, and the results can vary significantly based on the method used. Generally, metal surfaces offer better adhesion for paint, while plastic components may require additional preparation. Assessing the material composition is crucial to ensure that painting will yield satisfying results and not damage your appliance.
Material Assessment
Begin by identifying the materials of your Kitchen Aid. Most appliances feature a combination of metal and plastic components. Metal surfaces typically accept paint better than plastic, which can require special primers. This assessment helps determine the right type of paint and preparation needed for your project.
Potential Risks
Painting your Kitchen Aid can void warranties and potentially damage internal mechanisms if not done correctly. Risks include paint chipping, peeling, or interfering with appliance functionality. Understanding these risks will help you decide if this modification is worth pursuing.
Key Points:
- Assess material composition before painting.
- Understand the risks involved in painting kitchen appliances.
💡 Always test paint on a small, inconspicuous area first to gauge adhesion and appearance.
💡 Consider using high-heat resistant paint if the appliance will be near heat sources.
💡 Ensure the appliance is unplugged and cleaned thoroughly before starting your painting project.
Preparation and Painting Techniques
Once you’ve determined that painting your Kitchen Aid is feasible, the next step is to focus on preparation and painting techniques. Proper preparation ensures better adhesion and a smoother finish. This includes cleaning, sanding, and priming the surface before applying paint. Additionally, selecting the right painting technique can significantly influence the final appearance and durability of your work.
Surface Preparation
Begin by cleaning the appliance with a degreaser to remove any dirt and grease. Follow this with light sanding to create a rough surface for better paint adhesion. Be sure to wipe away any dust after sanding, as this can affect the paint’s ability to stick properly.
Choosing a Painting Technique
Spray painting is often recommended for appliances due to its smooth finish and even coverage. Alternatively, using a brush can provide more control but may result in brush strokes. Whichever technique you choose, ensure even application to avoid drips and uneven textures.
Key Points:
- Proper surface preparation is key to successful painting.
- Select a painting technique that suits your skill level and desired finish.
💡 Use painter’s tape to protect any areas you do not want to paint, ensuring clean lines.
💡 Consider applying a clear coat after painting to enhance durability and protect the finish.
💡 Allow adequate drying time between coats to achieve the best results.
EXPERT TIPS Pro Advice
Use high-quality paint designed for metal and plastic surfaces.
Quality paint ensures better adhesion and durability, reducing the likelihood of chipping or peeling over time.
Ventilate your workspace adequately.
Proper ventilation minimizes inhalation of fumes and ensures a safer painting environment.
Consider the color and finish carefully.
Choose colors that complement your kitchen decor, and select finishes like matte or glossy based on the look you want to achieve.
Practice patience during the painting process.
Rushing can lead to mistakes, so take your time to ensure each coat is applied evenly and allowed to dry thoroughly.
Research and follow specific guidelines for painting appliances.
Following established methods can help avoid common pitfalls and ensure a successful outcome.
Frequently Asked Questions
Conclusion
Painting your KitchenAid mixer is a creative way to customize your kitchen appliance, but it requires careful consideration of materials and techniques. Use food-safe paint and follow proper preparation methods to achieve a durable finish. Always check warranty implications before modifying your mixer.
🎯 Key Takeaways:
- You can paint your KitchenAid with food-safe paint.
- Proper preparation and priming enhance paint adhesion.
- Avoid painting the bowl for food safety reasons.
- Allow adequate drying time for the best results.
- Painting may void the warranty, so check terms.
Expert Advice: Taking the time to prepare and choose the right materials will ensure a successful painting project. Embrace your creativity, but prioritize safety and functionality.
Consider experimenting with different color schemes or patterns that reflect your personal style while ensuring your mixer remains functional and safe.