To attach a sausage stuffer to a meat grinder, insert the chosen sausage stuffer tube through the collar, place the collar and sausage stuffer tube on the main housing, and turn the collar clockwise until secure. This will allow you to easily stuff sausage casings using your meat grinder.
Making homemade sausage can be a fun and rewarding experience, but it can also be a bit daunting if you’re new to the process. By following these simple steps, you’ll be well on your way to creating delicious and unique sausage blends that your family and friends will love.
Whether you’re using a KitchenAid attachment or a standalone meat grinder, the process is essentially the same. Just be sure to use sharp tools and cut your meat and fat into small pieces for best results.
Introduction To Sausage Making At Home
To attach the sausage stuffer to the meat grinder, start by inserting the grind screw into the main housing, then place the blade over the end of the grind screw. Next, insert the chosen sausage stuffer tube through the collar and place the collar and sausage stuffer tube on the main housing, turning the collar clockwise until secure.
Benefits Of Homemade Sausage
Making sausage at home has numerous advantages. Firstly, homemade sausage allows you to control the ingredients, ensuring that only the freshest and highest quality meats and seasonings are used. Additionally, you can customize the flavors and adjust the level of spiciness to suit your preferences. Moreover, homemade sausage is free from preservatives and additives, making it a healthier option compared to store-bought varieties. Finally, the satisfaction of creating your own delicious sausages from scratch is a rewarding experience that cannot be replicated with store-bought options.
Tools Needed For Sausage Making
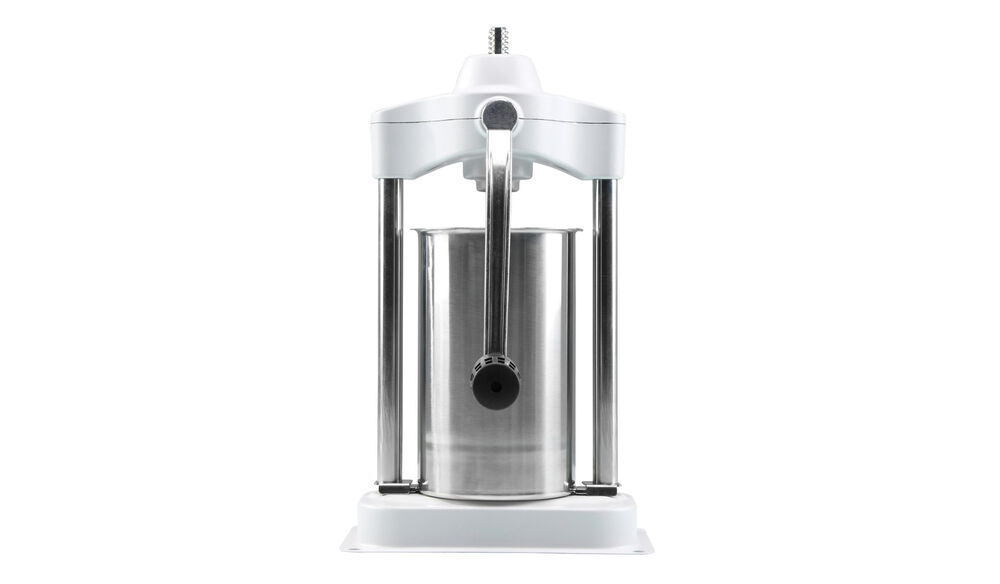
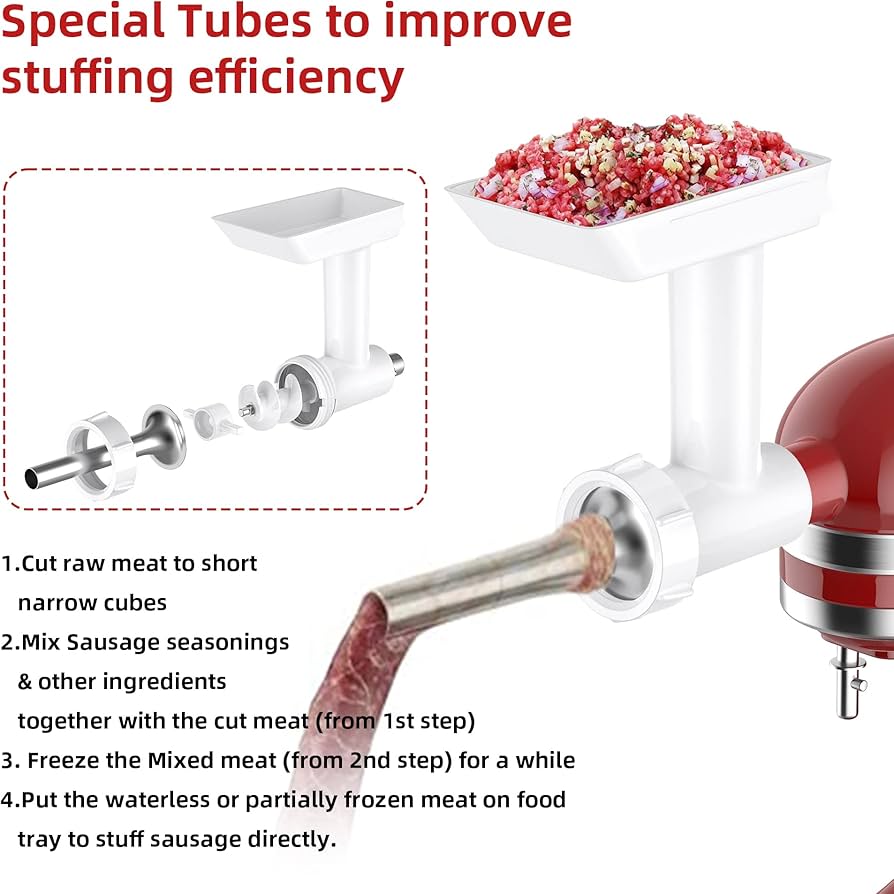
When it comes to making sausage at home, a few essential tools are required. These include a meat grinder, which is used to grind the meat and mix in the seasonings, ensuring a consistent and well-blended mixture. Additionally, a sausage stuffer is necessary for filling the casings with the prepared sausage mixture. Various sizes of sausage casings, such as natural hog casings or collagen casings, are also needed to encase the sausage mixture. Finally, having a selection of quality meats, spices, and herbs is essential to create flavorful and delicious homemade sausages.

Credit: lymanorchards.com
Understanding Your Meat Grinder
Parts Of A Meat Grinder
Before you start attaching the sausage stuffer to your meat grinder, it’s important to understand the different parts of the meat grinder. The key components include the hopper, pusher, screw, blade, and the grinding plate. The hopper is where you feed the meat, the screw pushes the meat towards the blade and grinding plate, and the pusher helps to guide the meat down the hopper.
Safety Precautions
When working with a meat grinder, safety should be a top priority. Always ensure that the grinder is turned off and unplugged before assembling or disassembling any parts. Additionally, make sure to follow the manufacturer’s instructions and use the appropriate tools to avoid any accidents.
Selecting The Right Sausage Stuffer Attachment
When it comes to making homemade sausages, having the right equipment is crucial. One of the key components you’ll need is a sausage stuffer attachment for your meat grinder. This attachment allows you to easily fill sausage casings with your ground meat mixture, resulting in perfectly shaped and delicious sausages. However, not all sausage stuffer attachments are created equal. In this section, we’ll explore the important factors to consider when selecting the right sausage stuffer attachment for your needs.
Comparing Sausage Stuffer Tubes
One of the first things to consider when choosing a sausage stuffer attachment is the type of stuffer tubes it comes with. Stuffer tubes are responsible for shaping the sausages and determining their size. Some attachments come with multiple tube sizes, allowing you to make sausages of different diameters. This versatility is especially useful if you plan on making different types of sausages with varying thickness. Additionally, consider whether the stuffer tubes are dishwasher safe for easy cleaning after use.
Materials And Durability
The materials used in the construction of the sausage stuffer attachment play a significant role in its durability and longevity. Look for attachments made from high-quality materials such as stainless steel, which are not only durable but also resistant to rust and corrosion. Stainless steel attachments are easy to clean and maintain, ensuring they will last for years to come. Avoid attachments made from low-quality materials that may break or wear out quickly, compromising the quality of your sausages.
Furthermore, pay attention to the overall build quality of the attachment. Check that all components are well-constructed and securely attached to prevent any accidents or mishaps during the sausage stuffing process. A sturdy and reliable attachment will make your sausage-making experience smoother and more enjoyable.
In conclusion, selecting the right sausage stuffer attachment for your meat grinder is essential for creating perfect homemade sausages. Consider the type and number of stuffer tubes included with the attachment, as well as the materials used in its construction. By choosing a high-quality and versatile attachment, you’ll be well on your way to making delicious sausages right in the comfort of your own kitchen.
Preparing Your Meat Grinder For Assembly
To attach a sausage stuffer to your meat grinder, follow these steps: First, insert the sausage stuffer tube through the collar and place it on the main housing. Then, turn the collar clockwise until secure. You can now assemble the meat grinder and sausage stuffer by inserting the grind screw into the main housing and placing the blade over the end of the grind screw.
Cleaning And Sanitizing
Before assembling your meat grinder and sausage stuffer, it is crucial to ensure that all the components are clean and sanitized. This step is essential for maintaining food safety and preventing any contamination. To clean the meat grinder and sausage stuffer, follow these steps:- Disassemble the grinder and stuffer by removing all the removable parts.
- Wash each part with warm, soapy water, making sure to remove any meat residue or grease.
- Rinse the parts thoroughly under running water to remove any soap residue.
- Sanitize the parts by either boiling them in water for a few minutes or using a food-safe sanitizer solution.
- Allow the parts to air dry completely before reassembling.
Inspecting For Wear And Tear
Before attaching the sausage stuffer to your meat grinder, it is essential to inspect both the grinder and stuffer for any signs of wear and tear. This step is necessary to ensure that the equipment functions properly and to prevent any accidents or malfunctions during the sausage-making process. Here’s how you can inspect your meat grinder and sausage stuffer:- Examine the grinder and stuffer for any cracks, dents, or damaged parts.
- Check the blades and plates of the grinder for sharpness and signs of corrosion.
- Inspect the stuffer tubes for any blockages or obstructions.
- Make sure all the components fit securely and tightly together.
Attaching The Sausage Stuffer To The Grinder
Attaching the sausage stuffer to the meat grinder is a simple process that requires a few steps. First, choose the correct size sausage stuffer tube and insert it into the collar. Then, place the collar and tube onto the main housing of the meat grinder and turn the collar clockwise until it is secure.
With these steps, you can easily attach the sausage stuffer to the meat grinder and start making delicious sausages at home.
Attaching the Sausage Stuffer to the Grinder is an important step in the sausage-making process. If you want to make sausages at home, you need to know how to properly attach the sausage stuffer to the meat grinder. In this article, we will guide you through the step-by-step assembly process of attaching the sausage stuffer to the grinder. We will also provide tips on securing the stuffer attachment to ensure that your sausage-making process goes smoothly.Step-by-step Assembly Process
To attach the sausage stuffer to the grinder, follow these steps:- Remove the grinding plate and blade from the grinder.
- Insert the sausage stuffer tube into the grinder’s head. Choose the tube size depending on the type of sausage you want to make.
- Attach the sausage stuffer plate to the grinder’s head. Make sure it is securely in place.
- Insert the sausage stuffer’s piston into the grinder’s head and push it all the way to the end of the tube.
- Replace the grinder’s locking ring and tighten it to secure the sausage stuffer attachment. Make sure it is tight enough to prevent the attachment from wobbling during use.
Securing The Stuffer Attachment
To ensure that the sausage stuffer attachment is securely in place, follow these tips:- Make sure that all parts are clean and dry before attaching the sausage stuffer to the grinder. Grease or moisture can cause the attachment to slip or wobble.
- Check that the sausage stuffer tube is fully inserted into the grinder’s head and is straight. If the tube is crooked, it can cause the sausage to come out unevenly.
- When tightening the locking ring, use a wrench or pliers to ensure that it is tight enough. A loose attachment can cause the sausage to leak out or the stuffer to fall off during use.
- Hold the grinder in place with one hand while using the sausage stuffer with the other. This will help prevent the attachment from wobbling or coming loose.
Preparing Your Sausage Mixture
To prepare your sausage mixture, attach the sausage stuffer to the meat grinder by inserting the sausage stuffer tube through the collar and placing it on the main housing. Turn the collar clockwise to secure it, and you’re ready to start stuffing your sausages.
Preparing Your Sausage Mixture When it comes to making homemade sausages, preparing the sausage mixture is a crucial step in achieving the perfect flavor and texture. Here are the essential steps to follow when preparing your sausage mixture. Selecting Ingredients The first step is to select your ingredients carefully. Choose the best quality meat, such as pork shoulder or beef chuck, and make sure it has the right amount of fat content. Typically, a ratio of 70% lean meat to 30% fat works best for sausages. You can also add spices, herbs, and other flavorings, depending on the type of sausage you’re making. Mixing Meat and Spices Once you have selected your ingredients, it’s time to mix the meat and spices. You can use a meat grinder to grind the meat and spices together, or you can mix them by hand. If you’re using a meat grinder, make sure it’s properly set up for stuffing sausages. To do this, you’ll need to attach the sausage stuffer to the meat grinder. To attach the sausage stuffer to the meat grinder, follow these steps: 1. Insert the sausage stuffer tube through the collar. 2. Place the collar and sausage stuffer tube on the main housing of the meat grinder. 3. Turn the collar clockwise until it’s securely attached to the meat grinder. Once you have attached the sausage stuffer to the meat grinder, you’re ready to start stuffing your sausages. Make sure your sausage casing is ready, and begin stuffing the meat mixture into the casing using the sausage stuffer. Keep in mind that the amount of meat you put in each casing will depend on the size of the casing you’re using. In conclusion, preparing your sausage mixture is a critical step in making delicious homemade sausages. By carefully selecting your ingredients and mixing them properly, you can achieve the perfect flavor and texture. And by following the steps to attach the sausage stuffer to the meat grinder, you’ll be well on your way to making your own sausages like a pro.Stuffing Sausages Like A Pro
Learn how to attach a sausage stuffer to a meat grinder like a pro with these easy steps. No need for complicated instructions or confusing setups – just follow along and start stuffing sausages with ease. Say goodbye to store-bought sausages and enjoy homemade ones with this simple technique.
Filling The Casing
To stuff sausages like a pro, the first step is to fill the casing with the seasoned meat mixture. Start by attaching the sausage stuffer to the meat grinder following the manufacturer’s instructions. Make sure the stuffer tube is securely inserted into the collar of the main housing. Next, take the prepared casing, which can be natural or synthetic, and slide it onto the stuffer tube. Ensure that the casing is evenly distributed along the tube, leaving enough space at the end for tying. It’s important to work with sharp tools and cut your meat and fat into small pieces to ensure smooth and consistent filling. Once the casing is on the stuffer tube, gently push the meat mixture into the grinder’s hopper. Use the grinder’s plunger or a separate utensil to push the meat down into the grinder. As you do this, the meat will be forced into the casing, filling it from one end to the other.Avoiding Air Bubbles
One challenge when stuffing sausages is avoiding the formation of air bubbles. These bubbles can cause the sausage to burst or create uneven texture. To prevent air bubbles, there are a few techniques you can try. First, make sure to remove any excess air from the casing before filling it. You can do this by gently squeezing the casing and running your fingers along it to push out any trapped air. This step will help create a tighter seal and reduce the chances of air pockets. Another tip is to work slowly and steadily when filling the casing. Avoid rushing or applying too much pressure, as this can force air into the mixture. Instead, use a consistent and controlled motion to ensure that the meat fills the casing evenly. Lastly, it can be helpful to twist the sausage into individual links as you fill the casing. This will help to further distribute the meat mixture and eliminate any potential air pockets. By following these steps and techniques, you’ll be able to attach the sausage stuffer to the meat grinder and stuff sausages like a pro. Filling the casing and avoiding air bubbles are crucial steps that will result in perfectly stuffed sausages every time. Happy sausage making!Cooking And Storing Your Homemade Sausage
To attach the sausage stuffer to the meat grinder, first, insert the sausage stuffer tube through the collar, then place the collar and tube on the main housing and secure it by turning the collar clockwise. Next, insert the grind screw into the main housing, place the blade over the end of the grind screw, and assemble the meat grinder attachment.
Cooking Techniques
Cooking homemade sausage is a delightful culinary adventure that allows you to savor the flavors of your favorite ingredients. To ensure the best results, follow these cooking techniques:- Grilling: Preheat your grill to medium-high heat. Brush the sausages with a little oil to prevent sticking and cook them for about 10-12 minutes, turning occasionally, until they are browned and cooked through.
- Pan-Frying: Heat a skillet over medium heat and add a small amount of oil. Cook the sausages for approximately 10-15 minutes, turning them frequently, until they are golden brown and cooked thoroughly.
- Oven-Baking: Preheat your oven to 375°F (190°C). Place the sausages on a baking sheet lined with parchment paper and bake for 20-25 minutes or until they reach an internal temperature of 160°F (71°C).
Proper Storage Methods
To maintain the quality and freshness of your homemade sausages, it is essential to store them correctly. Follow these proper storage methods:- Refrigeration: If you plan to consume the sausages within a few days, store them in an airtight container or wrap them tightly in plastic wrap and place them in the refrigerator. They can typically be stored for up to 3-4 days.
- Freezing: If you want to extend the shelf life of your sausages, freezing is the way to go. Place the sausages in a freezer-safe bag or wrap them tightly in freezer paper. Label the package with the date and store them in the freezer for up to 2-3 months.
- Thawing: When you’re ready to enjoy your frozen sausages, transfer them to the refrigerator and allow them to thaw overnight. Alternatively, you can thaw them in the microwave using the defrost setting.
Troubleshooting Common Issues
To attach the sausage stuffer to a meat grinder, first insert the sausage stuffer tube through the collar, then place it on the main housing and secure it by turning the collar clockwise. Insert the grind screw into the main housing, place the blade over the end, and you’re ready to go.
Handling Grinder Jams
If your meat grinder gets jammed, it can be frustrating, but there are a few simple troubleshooting steps you can take to resolve the issue. First, make sure to unplug the grinder to prevent any accidents. Then, disassemble the grinder and remove any stuck meat or fat from the feeding tube. Check the blades and plates for any clogging and clean them thoroughly. Once everything is clear, reassemble the grinder and try again. This should resolve most jamming issues.
Sausage Casing Problems
When encountering problems with sausage casings, it’s essential to address them promptly to avoid any issues with the sausage-making process. If the casing is too dry, soak it in warm water for about 30 minutes to rehydrate it. On the other hand, if the casing is too wet, gently pat it dry with a paper towel. Additionally, inspect the casing for any holes or tears, as these can lead to sausage filling leaks. In such cases, it’s best to discard the damaged casing and use a new one to ensure the quality of your sausages.

Credit: www.amazon.com
Cleaning And Maintenance
Proper cleaning and maintenance of your sausage stuffer and meat grinder are essential for ensuring their longevity and optimal performance. Below are some tips on how to effectively clean and maintain your equipment.
Post-use Cleaning Tips
After each use, it is crucial to thoroughly clean the sausage stuffer and meat grinder to prevent the buildup of meat residue and bacteria. The following post-use cleaning tips will help you maintain hygiene and extend the lifespan of your equipment:
- Disassemble the equipment by removing all removable parts such as the grinding plates, cutting blades, and sausage stuffer tubes.
- Wash the disassembled parts with hot soapy water, ensuring that all food particles and grease are completely removed.
- Use a brush or sponge to scrub hard-to-reach areas and remove any stubborn residue.
- Rinse the parts thoroughly and allow them to air dry completely before reassembling the equipment.
- Sanitize the equipment with a food-safe sanitizer to eliminate any remaining bacteria.
Maintaining Your Equipment
Regular maintenance is vital for keeping your sausage stuffer and meat grinder in top condition. By following these maintenance practices, you can prevent malfunctions and ensure consistent performance:
- Inspect the equipment before each use to ensure that all parts are in good condition and properly assembled.
- Apply food-grade lubricant to the moving parts to reduce friction and prevent wear.
- Check for any signs of wear or damage, such as worn-out gaskets or loose screws, and replace or tighten them as needed.
- Store the equipment in a clean and dry environment to prevent rust and corrosion.
- Refer to the manufacturer’s manual for specific maintenance guidelines and recommended cleaning products.
Additional Tips And Tricks
Learn how to attach a sausage stuffer to your meat grinder with these additional tips and tricks. Follow the step-by-step instructions to assemble the stuffer and make delicious homemade sausages. Say goodbye to store-bought sausages and enjoy the satisfaction of making your own at home.
When it comes to attaching a sausage stuffer to a meat grinder, there are a few additional tips and tricks that can enhance your sausage-making experience. These tips will help you create unique and flavorful sausages while ensuring that the attachment is securely in place.
Enhancing Flavor Profiles
One way to take your homemade sausages to the next level is by experimenting with different flavor profiles. By adding herbs, spices, and other seasonings to your sausage mixture, you can create a wide variety of delicious and unique sausages.
Here are some creative flavor combinations to try:
- Italian Herb: Mix in dried oregano, basil, and garlic powder for a classic Italian sausage.
- Spicy Cajun: Add cayenne pepper, paprika, and thyme for a bold and flavorful Cajun-style sausage.
- Smoky Maple: Combine smoked paprika, maple syrup, and black pepper for a sweet and savory breakfast sausage.
Feel free to experiment and create your own signature sausage flavors. Remember to adjust the seasoning quantities to suit your taste preferences.
Creative Sausage Varieties
Why stick to traditional sausage flavors when you can get creative and try something new? With the sausage stuffer attachment, you have the freedom to experiment with various ingredients and make unique sausage varieties.
Here are some creative sausage ideas to inspire you:
- Chicken and Apple: Combine ground chicken with finely chopped apples and sage for a delicious and juicy sausage.
- Spinach and Feta: Mix ground pork with spinach, feta cheese, and garlic for a flavorful Mediterranean-inspired sausage.
- Buffalo Blue Cheese: Blend ground buffalo meat with blue cheese and hot sauce for a spicy and tangy sausage.
Don’t be afraid to think outside the box and try new combinations. The possibilities are endless when it comes to creating unique and tasty sausages.
Remember, when attaching the sausage stuffer to the meat grinder, always follow the manufacturer’s instructions to ensure a secure and proper fit. By using these additional tips and tricks, you can elevate your sausage-making skills and impress your family and friends with delicious homemade sausages.

Credit: www.amazon.com
Frequently Asked Questions
How Do You Set Up A Grinder For Stuffing Sausage?
To set up a grinder for stuffing sausage, follow these steps: 1. Insert the chosen sausage stuffer tube through the collar. 2. Place the collar and sausage stuffer tube on the main housing and turn the collar clockwise to secure it.
3. For the meat grinder attachment, insert the grind screw into the main housing and place the blade over the end of the grind screw. 4. Make sure all parts are properly assembled and secure before use. 5. Refer to specific product instructions or watch tutorial videos for visual guidance.
Remember to always follow the manufacturer’s guidelines for safe and efficient operation.
How To Attach Sausage Stuffer To Meat Grinder Youtube?
To attach a sausage stuffer to a meat grinder on YouTube, follow these steps: insert the chosen sausage stuffer tube through the collar, place the collar and tube on the main housing, and turn the collar clockwise until it’s secure.
KitchenAid provides step-by-step instructions on assembling both the sausage stuffer and meat grinder. Other helpful videos and articles are available for preparing the meat grinder for stuffing sausage.
How Do You Use Sausage Attachment?
To use a sausage attachment, follow these steps: 1. Insert your chosen sausage stuffer tube through the collar. 2. Place the collar and sausage stuffer tube on the main housing. 3. Turn the collar clockwise until secure. 4. Cut your meat and fat into small pieces.
5. Use your grinder’s stuffing capabilities to stuff your sausage. With these simple steps, you can easily attach and use a sausage stuffer with your meat grinder.
Conclusion
Attaching a sausage stuffer to a meat grinder is a simple process that can enhance your culinary skills. By following the step-by-step instructions, you can elevate your sausage-making experience and create delicious homemade sausages. With the right equipment and proper assembly, you’ll be ready to enjoy the process of crafting your own unique sausage recipes.